Thursday, December 18, 2008

Cookie Walk

I was reading the local City Paper and saw an add for the annual Cookie Walk in Lawrenceville, PA which is right near downtown Pittsburgh, and I'd never been to a cookie walk before so it sounded fun. Basically, you walk from store to store and get a free cookie and recipe for it; so the stores get new visitors and you get free cookies! I was a little disappointed though because all of the cookies at every store were made by a single bakery, but the recipes seem to be from the store owners themselves. Here is the link to an article about the annual cookie walk: http://www.post-gazette.com/pg/08339/932457-34.stm

And here are pics of the cookies:

Photobucket

Photobucket

Photobucket

Photobucket

Photobucket

Photobucket

Photobucket

Photobucket

*The oatmeal was my favorite, it had sea salt on it, a really good flavor combination!

Cranberry Fluff

My boyfriend and his family would not stop going on and on about his grandmother's cranberry fluff-type thing she made every year for Thanksgiving, and since they were spending this Thanksgiving at the other side of the family, they weren't going to have any. So, I got the recipe from his mom and made it a few days later (I had never tried it before) and it was really simple and good!

Frozen Cranberry Salad (cranberry Fluff)

8oz softened cream cheese
2 Tbsp sugar
2 Tbsp mayo
8oz crushed pineapple (drained)
1 can whole cranberry sauce
8oz whipped topping


Cream cream cheese, mayo, and sugar with a mixer. Stir in pineapple, cranberries, and whipped topping.

Pour into an 8 x 8 pan, cover with foil and freeze. Let sit out 15 min before serving.

Photobucket

Photobucket

Photobucket

Photobucket

Tuesday, December 16, 2008

Blackberry Wine Cake

I haven't posted in awhile because of school taking up my time, and now I just had surgery on my left hand, so typing is a slow-go for me, but I'm going to try to get all my postings caught up.

First is this blackberry wine cake, the cook from my summer job told me about. He never got aroud to giving me the recipe but I found it online and made it in November for my boyfriend's mom's birthday. You can smell this cake a mile away!!! The glaze melted in, but that was all it needed, no icing necessary! As a bonus, the wine was only $5!!!!

Blackberry Wine Cake II
SUBMITTED BY: EYEPEAR


PREP TIME 10 Min
COOK TIME 40 Min
READY IN 55 Min
Original recipe yield 1 - 10 inch Bundt pan


INGREDIENTS
1 (18.25 ounce) package white cake mix
1 (3 ounce) package blackberry flavored gelatin
4 eggs
1/2 cup vegetable oil
1 cup blackberry wine

1 1/2 cups confectioners' sugar
1/2 cup blackberry wine

DIRECTIONS
Preheat oven to 325 degrees F (165 degrees C). Grease and flour a 10 inch Bundt pan.
In a large bowl, stir together cake mix and gelatin mix. Make a well in the center and pour in eggs, oil and blackberry wine. Beat on low speed until blended. Scrape bowl, and beat 4 minutes on medium speed. Pour batter into prepared pan.
Bake in the preheated oven for 40 to 45 minutes, or until a toothpick inserted into the center of the cake comes out clean. Pour 1/2 of blackberry wine glaze over top of cake while still warm. Let set for 10 minutes then remove cake from pan. Allow cake to cool fully before pouring the remaining glaze on top.
To make the Glaze: In a small bowl, stir together the confectioners' sugar and 1/2 cup blackberry wine.


Photobucket

Photobucket

Photobucket

Photobucket

Photobucket

Sunday, August 17, 2008

Pecan Tassies

A guy from work brought in some Pecan Tassies his wife made and I absolutely loved them. I found this recipe online at http://www.cdkitchen.com/recipes/recs/32/Pecan_Tassies351.shtml and attempted to make them. I didn't even try them because they looked too crisp, but the dough was good and everyone loved them so I guess they couldn't have been that bad. When he gives me his wife's recipe, I will make them again and post the better one.

Ingredients:

3 ounces cream cheese -- softened
8 tablespoons butter -- softened
1 cup flour
3/4 cup packed light brown sugar
1 teaspoon vanilla extract
1 pinch salt
1 large egg
2/3 cup pecans -- chopped
Turn this recipe into a puzzle! [click]


Directions:

Preheat oven to 350F degrees. In small bowl, with mixer at high speed, beat cream cheese with 7 tablespoons butter until creamy. Reduce speed to low; add flour and beat until well mixed.

With floured hands, divide dough into 24 equal pieces (dough will be very soft). With floured fingertips, gently press dough pieces evenly onto bottoms and up sides of twenty-four 1 3/4" by 3/4" ungreased miniature muffin-pan cups.

In medium bowl, with wire whisk or fork, mix brown sugar, vanilla, salt, egg, and remaining 1 tablespoon margarine or butter until filling is blended. Place half of pecans in pastry-lined cups.

Spoon filling by heaping teaspoons into each pastry cup; sprinkle tops with remaining pecans.

Bake 30 minutes or until filling is set and edges of crust are golden. With tip of knife, gently loosen tassies from muffin-pan cups and place on wire rack to cool completely. Store tassies in tightly covered container up to 1 week.

Photobucket

Photobucket

Photobucket

Photobucket

Photobucket

Irish Cream Fudge

I had a little Irish Cream left after making Erin's birthday cake so I decided to make this fudge. I've never made fudge before, and I'm not sure why you have to boil the sugar for 11 minutes, not 10. But it's pretty good and you can taste the Irish Cream. Other recipes I've came across use white chocolate, but I'm not a big fan of that so I used this recipe.

Bailey's Irish Cream Fudge Recipe
1. In a very large bowl, combine:

2 pkgs milk chocolate chips, 12 oz. EACH
1 (12 oz.) pkg. semisweet chocolate chips
2 jars marshmallow cream, 7 oz. EACH
2 t. vanilla
2/3 c. Bailey's Irish Cream
2 c. chopped nuts -- optional

2. Set aside.
3. Line a 10x15" pan with foil and spread lightly with: butter

4. In a saucepan, combine:

4 1/2 c. sugar
1 (12 oz.) can evaporated milk
1/2 lb. butter

5. Bring to a boil over medium heat.
6. Cook slowly, stirring constantly for 11 minutes.
7. Pour milk mixture over the chocolate chip mixture.
8. Stir slowly by hand to blend. (Do not use a mixer.)
9. Pour into prepared pan.
10. Chill until set.

Makes about 5 pounds of fudge.

Photobucket

Photobucket

Photobucket

Photobucket

Photobucket

Pittsburgh Pirates

I went to a Pirates game today at PNC Park. I had some pirogies, and took a pic, to be very Pittsburgh-like.

Photobucket

Ocean City, Maryland

Last weekend I went to Ocean City, MD for a few days. The weather was nice and we had fun and I wanted to post about this awesome candy store we found on the boardwalk... Wockenfuss. Everything was handmade and I bought my mom some saltwater taffy (in individual flavors), my dogs each a treat shaped like a life saver, and I also bought these little potato-shaped candies that tasted like coconut. Sadly, I do not have a picture of the little potatoes, but the looked exactly like miniature of the real things! The were the right off-white color and rolled in cinnamon or something to look like the skins!! Here are pics of the dog treats and also of some awesome looking Gelato I saw in Dewey Beach, DE. They had a lot of flavors, including words I don't even know. Sadly, I've never tried Gelato, but maybe someday!!

Photobucket

Photobucket

Thursday, August 14, 2008

Just Bunches!

I saw an ad in the paper for the new cereal from Honey Bunches of Oats: Just Bunches! And I had to buy it because I have always loved HBoO, though I usually buy the generic version because I think the corn flakes are sweeter in it, and because this was my idea; to have them just have bunches in the cereal, no flakes at all. I had a coupon for $1 off, and WalMart had the cereal on sale for 2.50, so I got a box for 1.50. It's a small box, but it should last a while because you don't want to do what I did; I filled my bowl up like normal, except the bunches are so big that it takes a while to chew... I've been eating this one bowl of cereal forever. But I definitely like it, and if I find more coupons I will buy it again. I think this cereal would be perfect in some time of struesel topping, trail mix, or cookie!!! Maybe I will even create a recipe!!

Photobucket

Monday, August 4, 2008

Coconut Bars

After making the coconut-lime snowballs, I had lots of coconut leftover, so I made these bars from Bakingblonde at http://bakingblonde.wordpress.com/2008/06/29/coconut-dream-bars-2/
They were super simple and easy to make, and the guys at work (aside from the coconut-haters) really liked them. The brown sugar is very noticeable and these bars are quite sweet, although they are not much to look at and not my favorite type of snack. However, like I said, the guys liked them so they were worth making.

Coconut Dream Bars
adapted from Recipezaar
1 1/2 cups flour
2 cups brown sugar, firmly packed (divided)
1/2 cup butter, softened slightly
3 large eggs
1 teaspoon baking powder
1 teaspoon vanilla
1/4 teaspoon salt
1 1/2 cups sweetened flaked coconut
1 1/2 cups semi-sweet chocolate chips (optional) or milk chocolate chips (optional)

Preheat oven to 350°F.
Line a 9×13 pan with foil. Spray lightly with PAM.
Using low speed on mixer, combine flour, 1/2 cup of the brown sugar and butter until mixture resembles sand.
Using lightly greased finger tips, press the mixture into bottom of prepared pan. Bake for 15 minutes.
While crust is baking, mix together the remaining brown sugar with eggs until just blended.
Stir in remaining ingredients.
Remove crust from oven when time is up and evenly spread coconut mixture over partially baked crust.
Bake for 20 to 25 minutes or until golden brown.
Cool completely and cut into squares. (Do this or they will be messy!!)


Photobucket

Photobucket

Photobucket

Photobucket

Photobucket

Coconut Lime Thai Snowballs

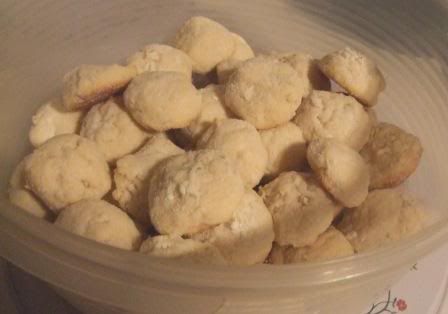
Last week I made these cookies from a recipe I found in the Pittsburgh Post Gazette last year. I am still looking for the recipe online so that I don't have to type it up (Lazy, I know) but if I can't find it, I will get it up here soon. The dough for this cookie was so good, I probably ate 4 or 5 cookies worth, and there were no eggs involved, so it was safe! They turned out ok, but the topping was a waste, the coconut/powdered sugar/lime did not stick to the cookie at all, so if anything I would just sift some powdered sugar on top and be done with it. I think these would be perfect for a tea party or some form of ladies event.

Coconut-Lime Thai Snowballs
Thursday, November 30, 2006


Coconut-Lime Thai Snowballs
Click photo for larger image.

COCONUT-LIME THAI SNOWBALLS

PG TESTED BY DIANA NELSON JONES

Tester's note: This recipe gives you the option of using lime juice instead of the first preference, lime oil. I decided to use the juice instead. The oil may be more pungent and make the cookies snappier. Additional lime zest would make the cookie coating more colorful. Also, I suggest you make the coating ahead of time.

Roll the balls out to the same size to prevent potential overbaking and crumbling.

Cookie mix:

* 1 cup (2 sticks) unsalted butter, softened
* 1 cup confectioners' sugar
* 1 teaspoon pure lime oil or 2 tablespoons lime juice
* 1 1/2 teaspoons finely grated lime zest
* 1/4 teaspoon salt
* 2 cups all-purpose flour
* 1 cup unsweetened shredded coconut, medium shred

Coating:

* 1 cup unsweetened shredded coconut, medium shred
* 1 cup confectioners' sugar, sifted
* 1 1/2 teaspoons finely grated lime zest
* 2 tablespoons cornstarch, sifted

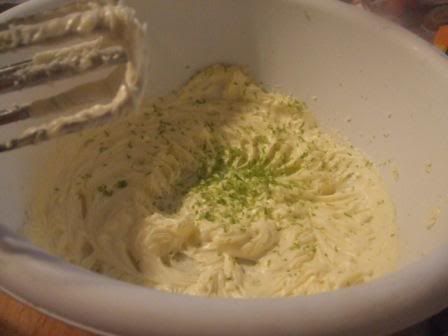
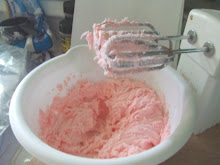
Preheat oven to 350 degrees with racks in lower and upper third of oven. Combine butter and sugar in a bowl. Using an electric mixer or wooden spoon, beat until light and fluffy. Add lime oil or juice; beat to combine.

Gently fold in lime zest, salt, flour and coconut. Blend well.

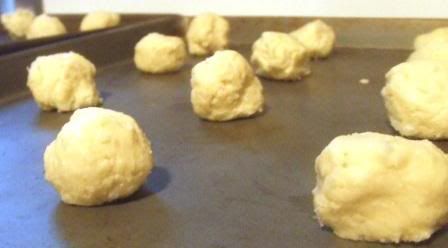
Lightly flour hands and roll dough into small, approximately 1-inch balls and place about 1 1/2 inches apart on an ungreased baking sheet.

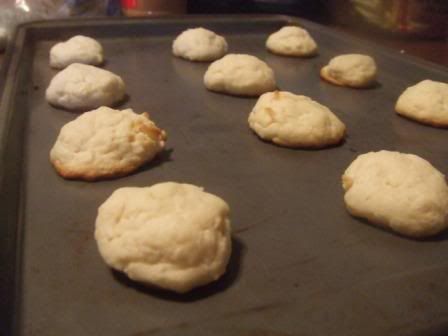
Bake until puffy (not browned) and bottoms are just golden, about 15 minutes. Allow cookies to cool on baking sheets for about 5 minutes.

Meanwhile, combine coating ingredients in a large plastic bag. While cookies are still warm, toss them in the coating. Remove and transfer to wire rack to cool completely.

Makes 4 to 5 dozen cookies


Photobucket

Photobucket

Photobucket

Photobucket

Photobucket

Monday, July 28, 2008

Blueberry Cheescake Bars

On Friday, a guy from work brought me in a tub of blueberries from his garden to make something with. So on Saturday, I made these cheesecake bars from a recipe I found online at http://www.bettycrocker.com/Recipes/Recipe.aspx?recipeId=42454 . It was one of the few cheesecake recipes that I could find that actually called for the berries, and not just jam, although this recipe called for both. I have to say the fresh blueberries were amazing after being cooked and the crust was perfect. I was a little worried that the oatmeal cookie crust would be strange since most people use a graham cracker crust, but it really tasted great.

Blueberry Cheesecake Bars

Prep Time:40 min
Start to Finish:4 hr 10 min
Makes:28 bars

1 pouch Betty Crocker® oatmeal cookie mix
1/2 cup butter or margarine, softened
1 egg
3 packages (8 oz each) cream cheese, softened
3/4 cup sugar
1/2 cup whipping cream
3 eggs
1 jar (10 oz) blueberry spreadable fruit
1 1/2 cups fresh or frozen (thawed and drained) whole blueberries

1. Heat oven to 350°F. Spray bottom and sides of 13x9-inch pan with cooking spray. In large bowl, beat cookie mix, butter and egg with electric mixer on low speed until soft dough forms. Press in bottom of pan.
2. Bake 15 minutes. Cool 10 minutes. Meanwhile, in another large bowl, beat cream cheese and sugar with mixer on medium speed until fluffy. Add whipping cream and eggs; beat on low speed until well blended.
3. Spread spreadable fruit over partially cooled crust. Sprinkle with blueberries. Pour cream cheese mixture evenly over blueberries, spreading gently to cover.
4. Bake 40 to 45 minutes or until center is set. Cool 30 minutes. Refrigerate at least 2 hours. For bars, cut into 7 rows by 4 rows. Store covered in refrigerator.
High Altitude (3500-6500 ft): In step 4, bake 45 to 50 minutes.


Photobucket

Photobucket

Photobucket

Photobucket

Photobucket

Photobucket

Photobucket

Photobucket

Photobucket

Photobucket

*I know I really need to start taking pictures of a single piece of things.